Have pain along the outside of your hip? What we often think of as trochanteric bursitis can actually be a tendinopathy of the gluteal tendons. The term “itis” refers to inflammation. Most of the time, there is no actual inflammation of the area, but an over-straining of the gluteal tendons and weakness in the hip musculature.
Chronic overuse of a weaker muscle (often the gluteus medius) and underuse of other very important muscles including the gluteus maximus, a big “work-horse” that’s supposed to be doing the heavy lifting, can lead to the increased strain, which causes the pain. How do we treat tendinopathy? Load it!
If your hip is quite painful (in the initial, reactive phase), isometric exercises can be a great way to load the tendon while also getting a nice analgesic effect to the area. Research shows us that the analgesic effect is most effective when holding isometric exercises for 45 seconds. Here are some of our go-to isometric exercises to load the gluteal tendons and strengthen the hip muscles. You can do these without a band to start, but loading with resistance is key, so “put a band on it!” as we like to say at Elevate. The band should be placed right above your knees.
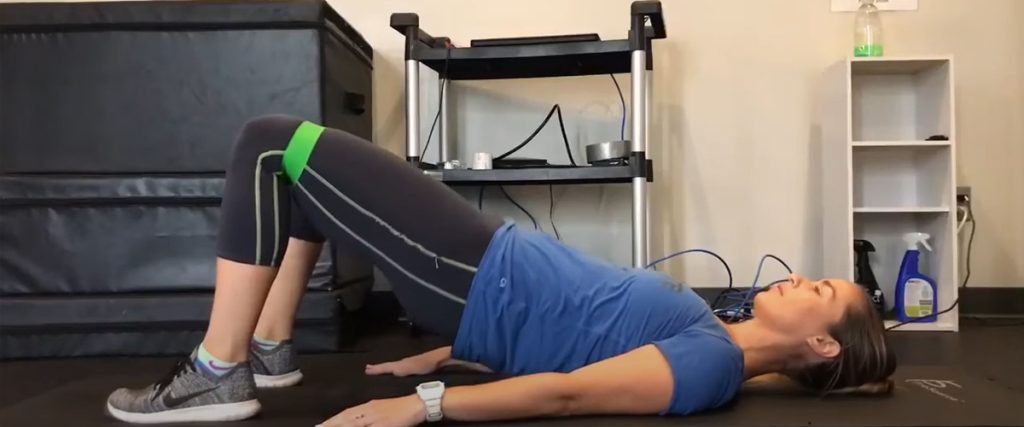
1️⃣ Bridge Hold – Lie on your back with your feet flat on the floor and your knees bent. Squeeze your glutes, activate your abdominals, and lift your hips off the floor. Make sure the movement comes from your hips and your lower back does not arch. Focus on squeezing the glutes together and pushing the band apart as you hold the position.
2️⃣ Sidelying Abduction – you can use a wall to help with this one. Lie on your side, a few inches away from the wall, with your legs straight and in line with your body. Keeping your hips stacked on top of each other and without rolling your body back, lift the top leg toward the ceiling, and reaching the heel to the wall, stretch the band as far as you can. You want to bring your leg behind you slightly, heel to the wall, with your knee facing forward, but don’t tip your pelvis backward. These adjustments are important to help minimize the activity of the Tensor Fascia Latae (TFL), to give you the best opportunity to isolate the gluteus medius and offer the best ratio of increased gluteus medius activity combined with decreased TFL activity. Think about staying long, reaching your leg away from your body, in order to minimize the amount of Quadratus Lumborum contraction in the back. These cues will help you feel this mostly in your gluteus medius. If you want to feel a little more stable in this position, simply bend the knee of your bottom leg so that that foot is behind you offering stability.
3️⃣ Clamshell – Lie on your side, back straight, hips and knees flexed in front of you at about a 45-60 degree angle, and your feet in line with your tailbone and in line with your shoulders. Make sure your hip bones are stacked on top of each other. Keeping your hips and pelvis in line and feet together, lift your top knee off the bottom one, stretching the band as far as you can. A common compensation people make is rolling back from the pelvis to help lift the knee – try to avoid this.
4️⃣ Quadruped Fire Hydrant – Start on your hands and knees with your wrists directly below your shoulders and your knees right underneath your hips. Keeping your knee bent, lift one leg out to the side, extend it back behind you, at about a 45-degree angle, and externally rotate from the hip so your knee should be further away from your body than your foot. Make sure your weight stays evenly distributed through both hands and that both hips bones stay facing the floor. You can put a ball on your lower back and not allow it to roll off in order to help you maintain a “neutral spine”.
5️⃣ Side Plank Hip Abduction – This is exactly like the side lying version except that you will be in a side plank position. You can start off by performing a modified side plank with your bottom knee remaining on the ground, and then progress to a full side plank.
6️⃣ Side Plank Clamshell – Similarly to the side plank hip abduction exercise, you can perform the clamshell from a modified or a full side plank position. Only progress to this variation once you are able to perform the side lying clamshell for 60 seconds.
7️⃣ Squat Hold – Standing with your feet about hip-width apart, squat down as though you are going to sit in a chair. Since we are focusing on the glutes in these exercises and not the quads, you want to make sure that you are hinged forward at the hips, leaning forward at the trunk and your knees stay over your ankles. If you look in a mirror from the side, you should see that your trunk is angled forward more than your shins. If you need an external cue to help, you can place a foam roller in front of your feet and make sure your knees do not move forward and touch the foam roller.
8️⃣ Surfer Squat – Start with your feet together and then step one foot back at a 90-degree angle. Rotate your trunk over the front leg and make sure you are pushing your knees out against the band. Sit your hips back and down into a squat as if sitting in a chair behind you, and hold.
9️⃣ Single Leg Fire Hydrant – Start in the squat position as in 7️⃣, then shift your weight onto one leg. Maintain a bend in the standing knee and hinge at the hip, as you bring the other leg out to the side and back, externally rotate the hip, and extending it back behind you, stretching the band, as you did in the quadruped fire hydrant exercise. You should be leaning forward at the trunk, and the knee of the standing leg should not go forward beyond your toes. Keep both hip bones facing the ground and do not overextend your back. You should feel this in the back side of the hip in both the standing leg and the lifting leg.
As a rule, if you’re feeling these exercises in the back of the hip/glutes, you’re on the right track! We recommend this order and progression of the exercises. However, the clamshell exercise(s) may cause compression of the gluteal tendons which may initially increase your symptoms. If this happens, the clamshell can be added later in the program when you are experiencing less pain.
Try #1 – #4 first, 3x, 45 second holds, alternating sides, daily. As your pain is reducing and you’re feeling stronger, progress to #5 – #9.
Give these a try, and come in to see us at Elevate for further guidance and customization to get back to doing what you love… without hip pain!